ADBMZ001 Smart Roller Blind User Manual-Others
User Manual

English


Model: ADBMZ001
Product Name: Smart Roller Blind
Platform: Standard Zigbee 3.0 · Works with third-party Zigbee gateways (Home Assistant / ZHA, Zigbee2MQTT, SmartThings, and more)
The Smart Roller Blind Robot upgrades bead-chain roller blinds into a smart roller blind device. It is a standard Zigbee 3.0 Window Covering device, so it can join a standard Zigbee 3.0 gateway and be controlled directly from that gateway's app or ecosystem. After installation and calibration, you can open, stop, and close the roller blind, adjust its position by percentage, and build scenes and automations in your chosen platform.

This product uses the Zigbee 3.0 communication protocol and joins any standard Zigbee 3.0 gateway that supports Window Covering devices. Once the gateway is connected to your home network, the device supports control, scenes, and automation through that platform's app.
Open / Stop / Close: Open, stop, and close from your Zigbee gateway's app
Percentage control: Adjust the roller blind to any 0–100% target position
Local button calibration: Complete travel calibration with the device buttons only — no App required
Local buttons: Open, close, stop, and enter pairing (addable) mode directly on the device
Scenes & automation: Build scenes and automations in your gateway's ecosystem
Voice control: Available through your ecosystem's voice assistant (Alexa, Google, etc.) once the blind is exposed to it
Charging status: Supports not charging, charging, and fully charged status
Local buttons: Supports local open, close, stop, and entering pairing (addable) mode
Drive wheel: Connects with the bead chain and drives the roller blind to open or close
Type-C charging port: Used to charge the device
Blue indicator light: Shows pairing, operation feedback, and charging status
Open button: Click to open; click during operation to stop; press and hold for about 5 seconds to enter pairing (addable) mode
Close button: Click to close; click during operation to stop; press and hold for about 5 seconds to enter pairing (addable) mode
Button near the indicator light: Press and hold for about 5 seconds to reset / enter addable mode
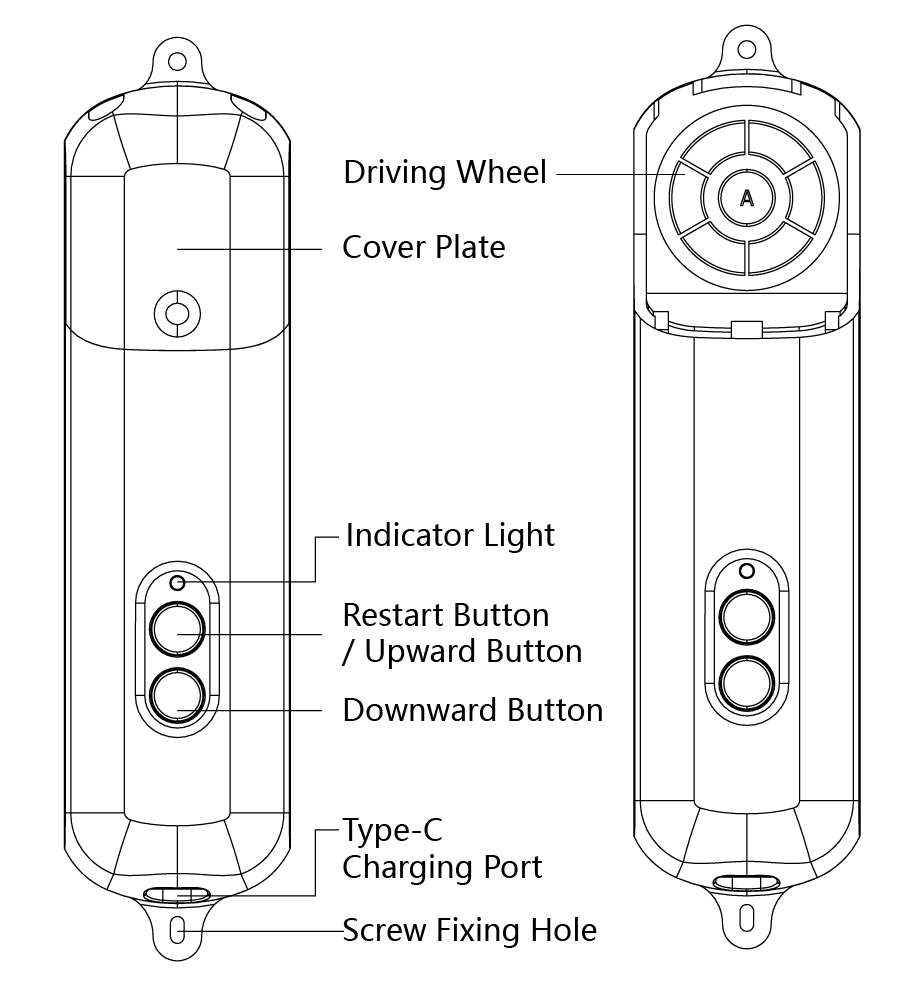
Use a Type-C charging cable to connect the device, and use a DC 5V/1A power adapter to charge the product. Do not use visibly damaged cables or adapters.

Addable / pairing: Blue light flashes
Charging: Blue light stays on
Fully charged: Blue light is off
No operation: Blue light is off
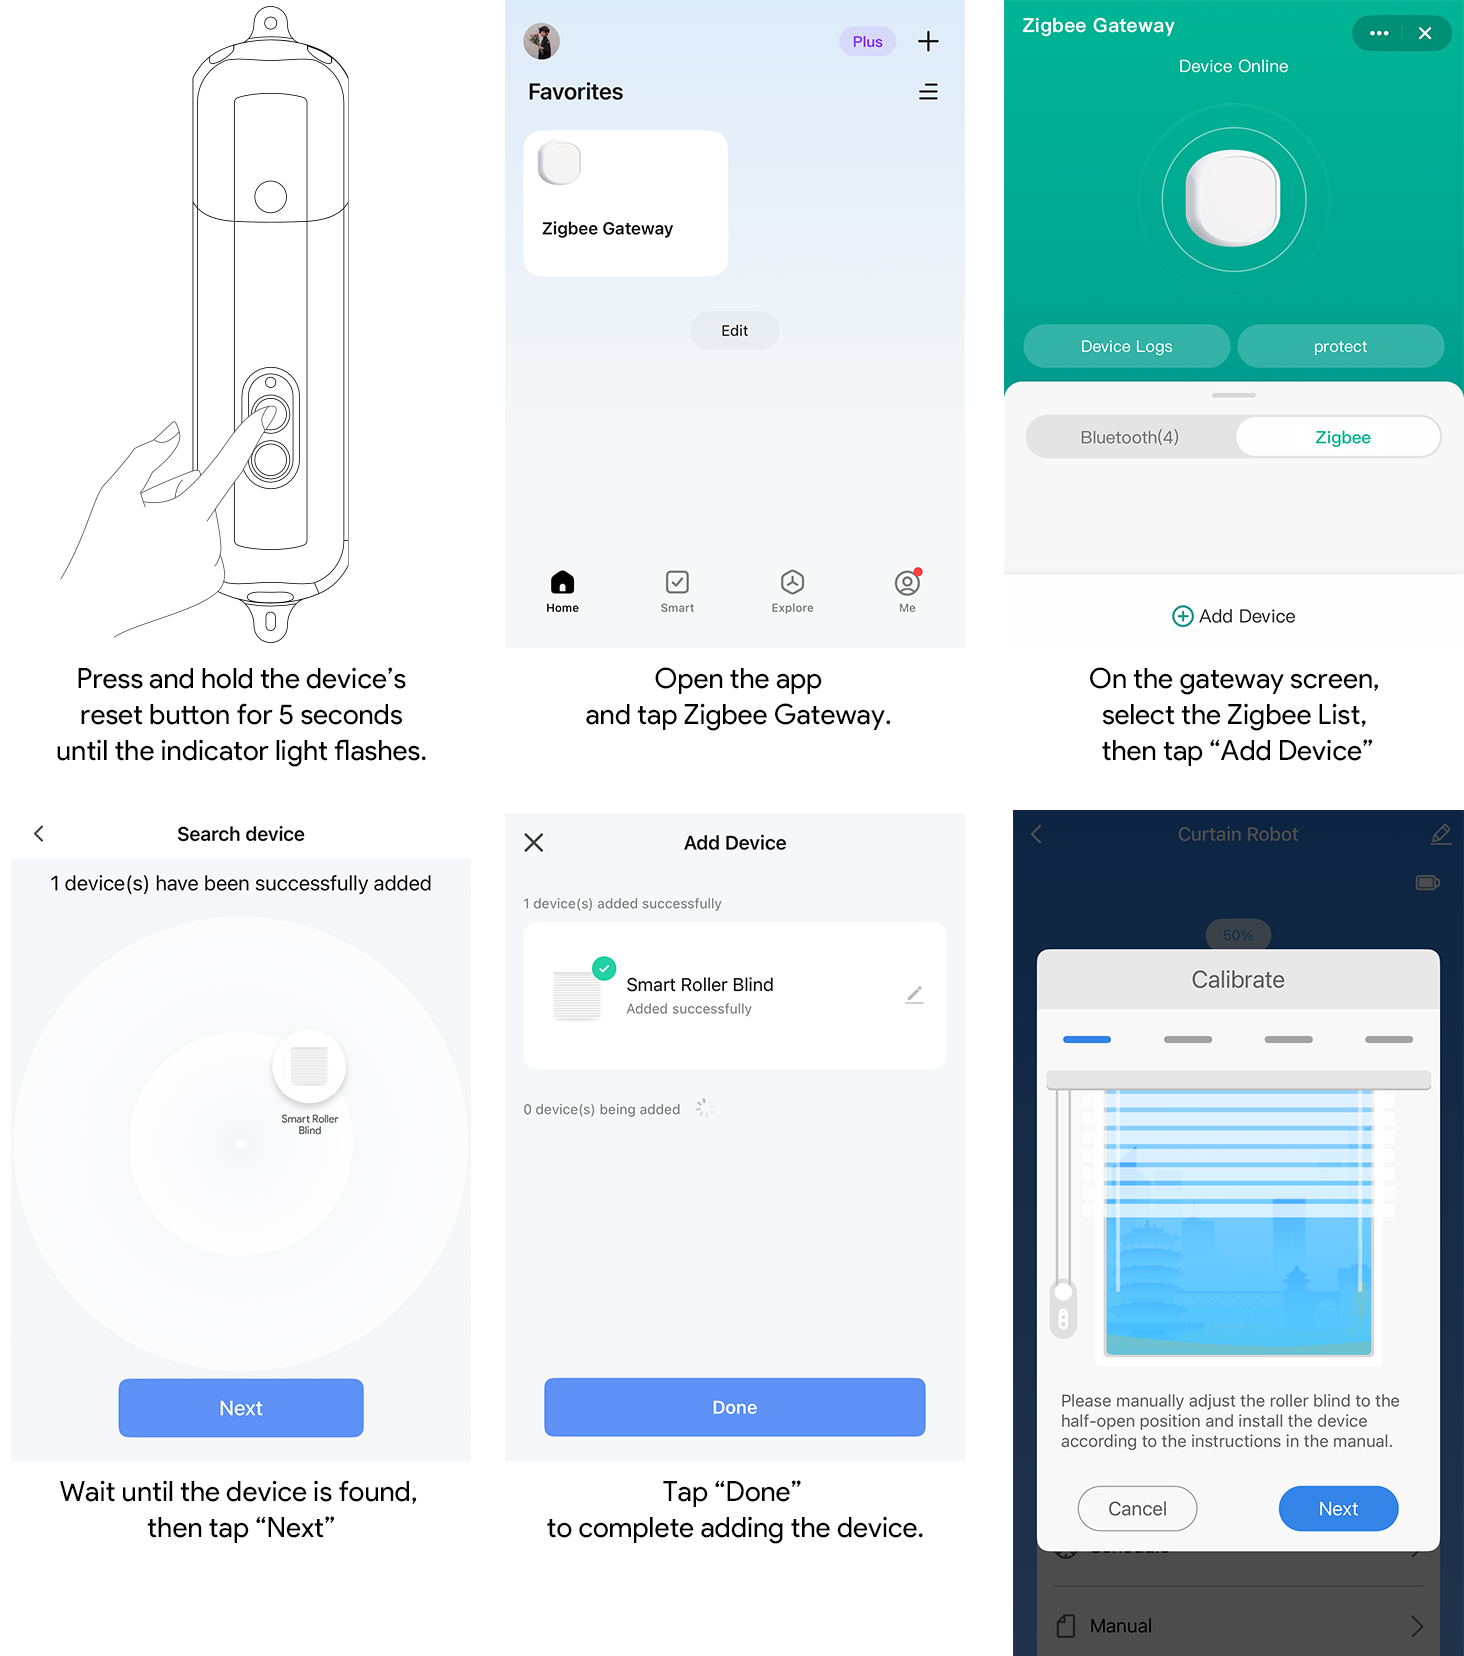
The device may be in sleep mode when shipped. Before first use, press and hold the open or close button for about 5 seconds until the indicator lights up or the blue light starts flashing. The device is now activated and ready to join your Zigbee gateway.
The device joins any standard Zigbee 3.0 gateway as a Window Covering device.
1. Open your gateway's app and start adding a Zigbee device (enable "permit join" / "Add device" / "Pair new device").
2. Put the device into addable mode: press and hold the open or close button for about 5 seconds until the blue light starts flashing.
3. Keep the device close to the gateway during first pairing.
4. Wait for the gateway to discover a Window Covering (roller blind) device and complete pairing.
5. After pairing, complete calibration on the device (see "Calibration (Local Buttons)").
The device works with standard Zigbee 3.0 gateways that support Window Covering devices, for example:
• Home Assistant (ZHA or Zigbee2MQTT): appears as a cover/window-covering entity with open, close, stop, and set-position controls.
• Samsung SmartThings: appears as a blind/shade device you can open, close, stop, and set to a position.
• Other standard Zigbee 3.0 gateways that support Window Covering devices.
Tip: The exact menu names for pairing differ per platform. Look for "Add device", "Pair new Zigbee device", or "Permit join" in your gateway's app.
Why calibrate: every roller blind has a different length and travel range. Calibration teaches the device the fully-open and fully-closed positions of your blind, so that open, close, and percentage positioning map accurately to its actual travel.
Calibrate the roller blind directly from the device buttons — no App required. Complete these 4 steps once after first installation or reinstallation. Each step tells you which button to press and what the indicator light does.
1. Enter and test direction: Press the open button 3 times in a row. The motor moves briefly once and stops automatically (after about 1 second) so you can see which way the blind moves. The indicator light breathes quickly.
2. Select direction (one press to confirm): Watch which way the roller blind just moved.
• If it moved up, press the open button.
• If it moved down, press the close button.
The indicator light turns off, and the device enters the up-travel step.
3. Travel to the top: Press the open button once — the roller blind travels up continuously. When it reaches the top, press the open button again to record the current position as the start point. The indicator light breathes quickly.
4. Travel to the bottom and save: Press the close button once — the roller blind travels down continuously. When it reaches the bottom, press the close button again. The full travel length is recorded and saved, and the indicator light stays on for about 3 seconds and then turns off. Calibration is complete.

Good to know:
• The entry gesture is the triple press (open button × 3). After entering, every step uses a single press: press once to move, press the same button again to stop and go to the next step.
• Up-travel uses only the open button, and down-travel uses only the close button. If you overshoot, simply redo that step.
• If you do not press anything for about 30 seconds, the device leaves calibration automatically and keeps your previous calibration.
Note: After installation and calibration are complete, do not manually pull the roller blind or bead chain, so as not to affect travel position and calibration results.
After the device is added, use your gateway's app to control it:
Open: The roller blind moves in the opening direction
Stop: The roller blind stops the current action
Close: The roller blind moves in the closing direction
Percentage / position: Move the roller blind to a specified position (0–100%)
Scenes & automation: Trigger open/close or set position through scenes and automations
Schedule: Set up to 4 weekly repeat tasks
Battery level: View the current battery level
Charging status: View not charging, charging, and fully charged status

This manual uses the following logic: 0% means fully open, and 100% means fully closed. If your gateway's app shows the logic differently, follow the actual app.
The device buttons work at any time, independent of the gateway:
Click the open button: Open; click during operation to stop
Click the close button: Close; click during operation to stop
Press the open button 3 times in a row: Enter local button calibration
Press and hold the open or close button for about 5 seconds: Enter / re-enter pairing (addable) mode
Once the roller blind is added to your gateway and exposed to a supported ecosystem, you can:
• Control the device remotely through your gateway's app;
• Build scenes and automations, such as opening or closing the blind at a fixed time each day;
• Use voice control through your ecosystem's voice assistant (for example Amazon Alexa or Google Assistant) after the blind is linked to it.
Product model: ADBMZ001
Product name: Smart Roller Blind Robot
English product name: Smart Roller Blind Robot
Dimensions: 209 × 52 × 38 mm
Weight: 249 g
Wireless protocol: Zigbee 3.0
Battery type: 3.7 V lithium battery
Battery capacity: 2000 mAh
Charging port: Type-C
Power input: DC 5V/1A
Compatible type: Bead-chain roller blinds; cord-type roller blinds not supported
Opening/closing method: Vertical opening
Operating temperature: 0°C~45°C / 32°F~113°F
Gateway compatibility: Standard Zigbee 3.0 (compatible with third-party Zigbee gateways)
Note: Mechanical and electrical specifications (dimensions, weight, battery capacity, operating temperature, etc.) are subject to the final hardware / BOM.
• This product is not waterproof. Do not use it in humid, water-splashed, or condensation-prone environments.
• The product contains a lithium battery. Do not use, charge, or store it in high-temperature environments.
• Do not obstruct the movement path while the device is running, otherwise the internal mechanical structure or motor may be damaged.
• Do not disassemble, modify, or repair this product by yourself.
• If the device has abnormal heating, odor, water ingress, shell damage, or abnormal operation, stop using it immediately.
• This product is only for auxiliary control of household roller blinds and must not be used in safety-critical scenarios involving medical, industrial, firefighting, or emergency escape functions.
• The package and accessories contain small parts. Keep them out of reach of children.
• Children are not recommended to install, charge, or operate this product by themselves.
• Prevent children from pulling the roller blind bead chain or playing with moving parts of the device.
• Use a compliant 5V/1A power adapter.
• Do not use damaged, aged, or loose charging cables.
• Keep the environment ventilated while charging, away from heat sources and flammable materials.
• Do not throw the product into fire, squeeze it, puncture it, or disassemble the battery.
• Use a trusted gateway account owned by you or your family member to bind the device.
• For multi-user use, it is recommended to authorize through your gateway's member/sharing feature instead of directly sharing account passwords.
• To unbind or transfer the device, first remove the device in your gateway's app, then press and hold the button for about 5 seconds to make the device enter addable mode again.
Confirm that your gateway is online and in "add device" / permit-join mode, that the device blue light is flashing, and that the device is close to the gateway, then try again. If it still cannot be added, press and hold the open or close button for about 5 seconds until the blue light flashes again, then pair the device again.
Use local button calibration. Press the open button 3 times in a row to enter, then follow the on-device steps using only the open and close buttons: test direction → travel to the top → travel to the bottom and save. See "Calibration (Local Buttons)" for the full steps and indicator light behavior.
Run local button calibration again and, at the direction step, select the button that matches the direction the blind actually moved. This sets the correct open/close direction.
Perform local button calibration again. Before calibrating, confirm that the roller blind is not blocked, the bead chain does not slip, and the main unit is installed securely.
Stop operation immediately and check whether the roller blind movement path, bead chain, or installation position has obstacles, tangles, or looseness. After resolving the issue, recalibrate.
Check whether the Type-C charging cable and 5V/1A adapter are normal and whether the connector is firmly inserted. If there is still no response after replacing the cable and adapter, stop using the product and contact after-sales service.